Last week, I had the opportunity to make a cake for a pie auction at my church. Every year, this auction is held to raise money for short term missions trips taken by the middle school and high school students. Though the name is officially "pie auction," they auction off cakes as well and I was asked to contribute one of my cakes. I haven't done a lot of cakes lately, so when I saw that I had the weekend free, I jumped at the chance! Being able to design and decorate a big cake while supporting a good cause was the best!
I wanted this cake to represent fall a little bit without being too obviously fall in color or design. I have been really drawn to geometric designs on cakes for awhile and lately have wanted to experiment with wafer paper, which is really hot right now. I took this opportunity to do both! I brought in the geometric element with the hexagons on the middle tier, and the wafer paper with the flowers.
The colors were a little bit fall while avoiding the typical browns and reds. I love the browns and reds of fall, but just didn't want that for this cake. So, I chose a navy blue (so hard to color!), gray, turquoise and bright orange for a little accent. I really love the way these colors turned out! They coordinate so well together and the orange is the perfect pop of color throughout.
I loved working with the wafer paper! This is obviously a fantasy flower and doesn't correspond at all to any real flower. I simply cut the wafer paper just like I would regular paper, cutting five equal tear-drop shapes for each flower. I then cut a slit in the pointed end of each piece and overlapped the edges ever so slightly, sticking them together with a drop of water, so that each petal would be cupped a little bit. I then used water very lightly again to attach all of the petals together and topped the center with a small ball of the orange fondant. Each flower was attached to the edge of the cake with another ball of fondant and some water.
I really love the way this cake turned out! The clean lines and geometric design are just what I love in cake design right now. It perfectly represents me and my personal cake style!
Underneath the pretty covering are three different types of cakes. The bottom tier (8-inches around) was dark chocolate cake with vanilla swiss meringue buttercream and dark chocolate ganache. The middle tier (a tall 6-inch round) was vanilla cake with vanilla swiss meringue buttercream and white chocolate ganache. The top tier (4-inches) was chai-spiced cake with vanilla swiss meringue buttercream and cinnamon which chocolate ganache. I think the top tier cake was my favorite. We all tasted the scraps from that one (I had nearly a whole layer left over) and agreed that it was one of the best I've ever made. Yum! I hope whomever won this cake enjoyed all the yummy flavors too!
This has been one of the most fun and most satisfying cakes to make. It really is one of my favorites! I am happy to say that I think it also was able to bring in a good amount for the missions at church too! A win for all!
Thanks for stopping by and taking a look! What is your favorite style in cake design? What flavor is your favorite?
Showing posts with label Cake. Show all posts
Saturday, November 22, 2014
Tuesday, July 8, 2014
Vanilla Cake Recipe
Hello! As promised, I am back with my vanilla cake recipe! Aren't you excited?? Now you can go make (and eat!) some delicious, out of this world, vanilla cake!
Before I get to the recipe, let me talk about just a couple of things. First, I use what is known as the reverse creaming method, or 2-stage method, in all of my cakes. You will see that reflected in the recipe below. This is by far the easiest method to baking cakes from scratch. I always start by weighing each of my dry ingredients directly in the bowl of my stand mixer, making little piles of each ingredient, somewhat separated from each other, just in case I add to much and need to remove a bit. This eliminates a lot of potential baking errors. Did you know that a single cup of flour measured into a dry measuring cup can differ in weight by up to 1 or 2 ounces depending on who is measuring and how they are putting the flour into the cup? This can lead to a very dry cake and inconsistent results. So, always weigh your ingredients! It really does make all the difference in the world. And it's easier, too! Can't beat that!
While I'm on the subject of flour, in this recipe I use both cake flour and all purpose flour. The cake flour, with its lower protein level, is what will ultimately give the cake it's fine, tender crumb, which in my opinion is the sign of an excellent cake. All purpose flour strengthens the cake a bit, making it easier to stack, carve, and otherwise manipulate into a fabulous decorated cake. You can use only all purpose flour (keep the weights the same), but the crumb of your finished cake won't be quite as nice. You can also use only cake flour, which I often do. My favorite is King Arthur Unbleached Cake Flour that I buy at my local Meijer grocery store. You can also order it online directly from King Arthur Flour.
After you mix the dry ingredients together, you add the butter. The butter gets broken up into little pieces and coats the flour, which in turn keeps the flour from creating protein bonds, the gluten, that toughen the cake. Of course, some gluten will develop and you do want this so that the cake holds together. But the butter added to the flour first keeps the batter from developing too much gluten. It helps to protect the batter from being overworked. You add your liquids next and then the eggs.
This batter comes together super fast. It bakes up perfectly moist with a nice, tender crumb and lovely soft vanilla flavor. If you want to make it a "rainbow" cake, like I did for Kate's birthday, just mix about 1/2 cup of rainbow-colored jimmies or other sprinkles into the batter before putting it in the pans.
Let me know if you try this cake and what you think! Enjoy!
Before I get to the recipe, let me talk about just a couple of things. First, I use what is known as the reverse creaming method, or 2-stage method, in all of my cakes. You will see that reflected in the recipe below. This is by far the easiest method to baking cakes from scratch. I always start by weighing each of my dry ingredients directly in the bowl of my stand mixer, making little piles of each ingredient, somewhat separated from each other, just in case I add to much and need to remove a bit. This eliminates a lot of potential baking errors. Did you know that a single cup of flour measured into a dry measuring cup can differ in weight by up to 1 or 2 ounces depending on who is measuring and how they are putting the flour into the cup? This can lead to a very dry cake and inconsistent results. So, always weigh your ingredients! It really does make all the difference in the world. And it's easier, too! Can't beat that!
While I'm on the subject of flour, in this recipe I use both cake flour and all purpose flour. The cake flour, with its lower protein level, is what will ultimately give the cake it's fine, tender crumb, which in my opinion is the sign of an excellent cake. All purpose flour strengthens the cake a bit, making it easier to stack, carve, and otherwise manipulate into a fabulous decorated cake. You can use only all purpose flour (keep the weights the same), but the crumb of your finished cake won't be quite as nice. You can also use only cake flour, which I often do. My favorite is King Arthur Unbleached Cake Flour that I buy at my local Meijer grocery store. You can also order it online directly from King Arthur Flour.
After you mix the dry ingredients together, you add the butter. The butter gets broken up into little pieces and coats the flour, which in turn keeps the flour from creating protein bonds, the gluten, that toughen the cake. Of course, some gluten will develop and you do want this so that the cake holds together. But the butter added to the flour first keeps the batter from developing too much gluten. It helps to protect the batter from being overworked. You add your liquids next and then the eggs.
This batter comes together super fast. It bakes up perfectly moist with a nice, tender crumb and lovely soft vanilla flavor. If you want to make it a "rainbow" cake, like I did for Kate's birthday, just mix about 1/2 cup of rainbow-colored jimmies or other sprinkles into the batter before putting it in the pans.
Let me know if you try this cake and what you think! Enjoy!
Velvety Vanilla Cake
1-1/2 cups (5-1/4 ounces) cake flour
1-1/2 cups (5-1/4 ounces) all purpose flour
1 tablespoon baking powder
1/8 teaspoon baking soda
3/4 teaspoon salt
1-1/2 cups (10-1/2 ounces) granulated sugar
3 large eggs*
1 tablespoon pure vanilla extract
1/2 teaspoon pure almond extract
1/2 cup (4 ounces) buttermilk
1/4 cup (2-1/8 ounces) crème fraiche**, sour cream or plain Greek yogurt
1/2 cup (4 ounces) unsalted butter, room temperature and cut into 1/2-inch pieces
Preheat oven to 350 degrees F. Prepare two 2-inch tall 8-inch round pans by greasing the bottoms and sides with shortening or butter, then lining the bottom of each pan with a greased round of parchment paper.
In the bowl of an electric mixer, combine cake flour, all purpose flour, baking powder, baking soda, salt and sugar. Mix on low for at least 30 seconds. Add the butter and mix on low until combined and butter is broken up into pea-sized pieces. Add the buttermilk and crème fraiche. Mix on low until dry ingredients are moistened, then mix on medium-high for 1-1/2 minutes, scraping the sides of the bowl as necessary.
Meanwhile, in a medium bowl, whisk together the eggs, vanilla extract and almond extract. Add the egg mixture to the butter mixture in three parts, adding each part on low speed and then mixing on high speed for 20 seconds. Scrape down the sides and pour into prepared cake pans. Bake until top springs back when touched with a finger and toothpick inserted in the center comes back with moist crumbs clinging to it, about 35-40 minutes.
*This makes a vanilla cake that is somewhat yellow in color because of the butter and whole eggs. If you prefer a cake that is lighter in color, substitute 6 eggs whites (6 ounces) for the whole eggs. If you would like a more traditional yellow cake, substitute 6 egg yolks for the whole eggs.
**Crème fraiche is wonderful in this recipe and I recommend making the effort to use it. You can easily make your own crème fraiche by adding 4 tablespoons of cultured buttermilk (homemade or store-bought) to 2 cups of heavy cream. Mix well and cover. Let sit at room temperature for 6-8 hours, or up to overnight, until it has thickened. Store in the refrigerator for up to 2 weeks.
Monday, June 30, 2014
Fashion Barbie Birthday
About a week ago, my baby turned seven. I can hardly believe it! Blink of an eye. Truly. My little girl is so fun to have around. She is full of smiles and joy nearly all the time. I cannot imagine my life without her!
For her birthday cake, she had only one request and that was to have what she called a "rainbow cake," or, by her definition, a vanilla cake with rainbow jimmies in the batter. I was going to do a simple buttercream cake with sprinkles also on the outside, but a few days before the big day, I happened upon Ipoh Bakery's facebook page. Such amazing doll cakes, like none I had seen before. (Please take a moment to go and look at these cakes. You will be amazed!) I began to get inspired. So, I showed them to Kate and she also loved them. It was decided. We would do our own version for her birthday. Probably not the best planning on my part to change the whole design, making it a LOT more complicated, just three days before her birthday, but it all worked out!
I really love this cake and I had so much fun doing this one, from the initial design of the dress, to putting it all together.
The doll first got a layer of white fondant in the outline of the dress. I rolled the fondant very thin, knowing nearly all of it would eventually be covered. I wrapped the doll's torso, beginning just under where the edge of the fondant would be, tightly with plastic wrap to keep her from getting too sticky, then attached the fondant with a little water. For the perfect fit, I draped the fondant onto the doll first, then cut carefully with an exacto knife. It was a little tricky! Some of the pieces I had to do more than once.
The bodice of the dress is my favorite part. I covered the white fondant with white, pink and red non-pariels using a mix of water and corn syrup to make it stickier than water alone. I wanted these little balls to really stick and not come off when I handled the doll to put her on the cake later on. It worked beautifully. I did have to fill in a few spots with a toothpick at the end, but not many.
If you do anything with non-pariels, you know that they get absolutely everywhere! I held the doll over a quarter sheet pan and worked in small sections to minimize the mess. I let this part of the doll dry overnight and made sure I really pressed the non-pariels into the fondant, gently but firmly, to keep them from falling off.
The cake is entirely in the doll's skirt and instead of surrounding the doll's legs as in typical Barbie cakes, the cake and skirt on this one is behind the doll. I baked three 8-inch rounds and carved them into a slightly domed shape. I then cut a small section out of the front for the doll's body, softening the edges by carving them. Because this cake is more than four inches tall, I did put a cardboard cake board, cut to be completely within the cake so that I could carve the cake, and bubble tea straws. Sorry I don't have a picture of this internal structure for you! Next time...
Once the doll's bodice and first skirt layer was complete, I made tiny little shoes for her. I stuck with a super simple design for the shoes. Tiny Barbie shoes are hard!
Next, I stood Barbie up on those tiny shoes and placed her against the cake. Once she was in place, I started covering the entire skirt, beginning with what was against her body in the front, with very thin fondant circles. I cut different sizes of circles and ruffled the edges with a ball tool. For the very front, I left the circles whole, but for the majority of the skirt, I cut them in half and used half at a time, layering over the cut edge as a I went. As I put the half-circles onto the cake, I gently gathered the straight cut edge so that the bottom edge would have an even more ruffled look and to give each circle some dimension on the cake. Without this step, the circles would have fallen flat again each other.
I wanted the skirt to appear as if it was flowing gently in one direction, so that is how I place the ruffles. There are so many circles on this skirt! This part took me so much longer than I expected, but the look in the end was totally worth it.
Another of my favorite details is the piece on the doll's shoulder. I love how it brings the skirt detail to the top of the dress and completes the design.
Finally, I added a pink bow at the waist. So pretty! I think this was Kate's favorite part of the dress. I love how it pulls the bodice and the skirt together and also gives a sense of movement.
Here are a couple more views.
And the birthday girl. I'd say she's pretty happy with everything!
I tell you, this was one of the hardest cakes for me to cut. I finished the cake only two hours before it was time to serve it. I almost couldn't get myself to cut into that skirt! But, as my kids pointed out, what good is a cake that looks pretty but you can't eat? Yes, this is an art that is not meant to last.
Here is a peek at a slice. I just love the look of the cake inside, too! Look at those layers! Isn't it making you hungry?
What you see inside is vanilla cake with vanilla swiss meringue buttercream. Absolutely delicious. I love love love this vanilla cake recipe. I am constantly tweaking it as I learn more and more about ingredients and baking techniques. I promise, though, that I will share this recipe next time. This post is just too long already! Plus, now you all have a reason to come back! :)
In the meantime, check out this post by CakePaperParty about swiss meringue buttercream. The same author talks about this new method on The Cake Blog, here. In these posts, Summer Stone really digs into the science behind this tricky confection and demystifies it, introducing a whole new way to make this buttercream. Seriously, this is revolutionary for me. Swiss meringue buttercream is by far my favorite buttercream and now it is easier to make (but just as delicious)! I hope that you will try it out for your next cake! I will note that I use a little more butter in my swiss meringue so that the overall taste is less sweet and more buttery. You can make it to suit your own tastes, though. Don't be afraid to experiment!
Thanks for stopping by!
For her birthday cake, she had only one request and that was to have what she called a "rainbow cake," or, by her definition, a vanilla cake with rainbow jimmies in the batter. I was going to do a simple buttercream cake with sprinkles also on the outside, but a few days before the big day, I happened upon Ipoh Bakery's facebook page. Such amazing doll cakes, like none I had seen before. (Please take a moment to go and look at these cakes. You will be amazed!) I began to get inspired. So, I showed them to Kate and she also loved them. It was decided. We would do our own version for her birthday. Probably not the best planning on my part to change the whole design, making it a LOT more complicated, just three days before her birthday, but it all worked out!
I really love this cake and I had so much fun doing this one, from the initial design of the dress, to putting it all together.
The doll first got a layer of white fondant in the outline of the dress. I rolled the fondant very thin, knowing nearly all of it would eventually be covered. I wrapped the doll's torso, beginning just under where the edge of the fondant would be, tightly with plastic wrap to keep her from getting too sticky, then attached the fondant with a little water. For the perfect fit, I draped the fondant onto the doll first, then cut carefully with an exacto knife. It was a little tricky! Some of the pieces I had to do more than once.
The bodice of the dress is my favorite part. I covered the white fondant with white, pink and red non-pariels using a mix of water and corn syrup to make it stickier than water alone. I wanted these little balls to really stick and not come off when I handled the doll to put her on the cake later on. It worked beautifully. I did have to fill in a few spots with a toothpick at the end, but not many.
If you do anything with non-pariels, you know that they get absolutely everywhere! I held the doll over a quarter sheet pan and worked in small sections to minimize the mess. I let this part of the doll dry overnight and made sure I really pressed the non-pariels into the fondant, gently but firmly, to keep them from falling off.
The cake is entirely in the doll's skirt and instead of surrounding the doll's legs as in typical Barbie cakes, the cake and skirt on this one is behind the doll. I baked three 8-inch rounds and carved them into a slightly domed shape. I then cut a small section out of the front for the doll's body, softening the edges by carving them. Because this cake is more than four inches tall, I did put a cardboard cake board, cut to be completely within the cake so that I could carve the cake, and bubble tea straws. Sorry I don't have a picture of this internal structure for you! Next time...
Once the doll's bodice and first skirt layer was complete, I made tiny little shoes for her. I stuck with a super simple design for the shoes. Tiny Barbie shoes are hard!
Next, I stood Barbie up on those tiny shoes and placed her against the cake. Once she was in place, I started covering the entire skirt, beginning with what was against her body in the front, with very thin fondant circles. I cut different sizes of circles and ruffled the edges with a ball tool. For the very front, I left the circles whole, but for the majority of the skirt, I cut them in half and used half at a time, layering over the cut edge as a I went. As I put the half-circles onto the cake, I gently gathered the straight cut edge so that the bottom edge would have an even more ruffled look and to give each circle some dimension on the cake. Without this step, the circles would have fallen flat again each other.
I wanted the skirt to appear as if it was flowing gently in one direction, so that is how I place the ruffles. There are so many circles on this skirt! This part took me so much longer than I expected, but the look in the end was totally worth it.
Another of my favorite details is the piece on the doll's shoulder. I love how it brings the skirt detail to the top of the dress and completes the design.
Finally, I added a pink bow at the waist. So pretty! I think this was Kate's favorite part of the dress. I love how it pulls the bodice and the skirt together and also gives a sense of movement.
Here are a couple more views.
And the birthday girl. I'd say she's pretty happy with everything!
I tell you, this was one of the hardest cakes for me to cut. I finished the cake only two hours before it was time to serve it. I almost couldn't get myself to cut into that skirt! But, as my kids pointed out, what good is a cake that looks pretty but you can't eat? Yes, this is an art that is not meant to last.
Here is a peek at a slice. I just love the look of the cake inside, too! Look at those layers! Isn't it making you hungry?
What you see inside is vanilla cake with vanilla swiss meringue buttercream. Absolutely delicious. I love love love this vanilla cake recipe. I am constantly tweaking it as I learn more and more about ingredients and baking techniques. I promise, though, that I will share this recipe next time. This post is just too long already! Plus, now you all have a reason to come back! :)
In the meantime, check out this post by CakePaperParty about swiss meringue buttercream. The same author talks about this new method on The Cake Blog, here. In these posts, Summer Stone really digs into the science behind this tricky confection and demystifies it, introducing a whole new way to make this buttercream. Seriously, this is revolutionary for me. Swiss meringue buttercream is by far my favorite buttercream and now it is easier to make (but just as delicious)! I hope that you will try it out for your next cake! I will note that I use a little more butter in my swiss meringue so that the overall taste is less sweet and more buttery. You can make it to suit your own tastes, though. Don't be afraid to experiment!
Thanks for stopping by!
Tuesday, June 3, 2014
Sweet Little Bridal Shower Cake
Hello and welcome!
Back at Easter of this year, I had the opportunity to meet a wonderful woman, a friend of a friend, who wanted a cake to celebrate her soon-to-be daughter-in-law. Cheryle was so sweet and I am happy to now call her a friend too!
One of the bride's favorite colors is Tiffany blue. This also happens to be one of my favorites, so I was excited to design a cake with that color. You will recognize it as almost the exact color of the little blue cake I last posted here on the blog.
I began the design with a copy of the invitation. It was simple and elegant, naturally lending itself to a simple and pretty design with strips of Tiffany blue fondant and some sparkly accents.
Take a look!
The flower is my favorite part.
Though not edible, the little jewel in the center was perfect for this flower and this cake! I adore how it turned out.
I absolutely love the way the Tiffany blue strips are highlighted against the simple white background. The little jewel accents were a perfect match to the invitations and set everything off so well!
The cake itself, I'm told, was to die for. I'm so happy when the flavors of my cakes get as high of reviews as the decoration! I truly do try hard to achieve excellence in both! The bottom tier was dark chocolate with vanilla Swiss meringue buttercream filling, covered in dark chocolate ganache and fondant. The top tier was vanilla cake with raspberry Swiss meringue buttercream filling, covered in white chocolate ganache and fondant. Doesn't that sound delicious? My mouth is watering right now...
I hope you enjoyed this look at this cake. Cheryle, thank you for allowing me to be a part of your celebration!
Back at Easter of this year, I had the opportunity to meet a wonderful woman, a friend of a friend, who wanted a cake to celebrate her soon-to-be daughter-in-law. Cheryle was so sweet and I am happy to now call her a friend too!
One of the bride's favorite colors is Tiffany blue. This also happens to be one of my favorites, so I was excited to design a cake with that color. You will recognize it as almost the exact color of the little blue cake I last posted here on the blog.
I began the design with a copy of the invitation. It was simple and elegant, naturally lending itself to a simple and pretty design with strips of Tiffany blue fondant and some sparkly accents.
Take a look!
The flower is my favorite part.
Though not edible, the little jewel in the center was perfect for this flower and this cake! I adore how it turned out.
I absolutely love the way the Tiffany blue strips are highlighted against the simple white background. The little jewel accents were a perfect match to the invitations and set everything off so well!
The cake itself, I'm told, was to die for. I'm so happy when the flavors of my cakes get as high of reviews as the decoration! I truly do try hard to achieve excellence in both! The bottom tier was dark chocolate with vanilla Swiss meringue buttercream filling, covered in dark chocolate ganache and fondant. The top tier was vanilla cake with raspberry Swiss meringue buttercream filling, covered in white chocolate ganache and fondant. Doesn't that sound delicious? My mouth is watering right now...
I hope you enjoyed this look at this cake. Cheryle, thank you for allowing me to be a part of your celebration!
Sunday, March 16, 2014
Sweet Little Blue Cake
Happy (almost) Spring! Last year at about this time, I made a little bright yellow cake to try to help usher in springtime. You might remember it and it is still one of my all-time favorites. You can find all of the details about that cake here.
This is always the time of year when we long for spring to come, for winter and cold temperatures to tuck themselves away for the season and be done, and for the sun to shine warmly once again. This year is no different. In fact, I think we are all longing for spring even more than usual after this hard and utterly cold winter we've all had!
This cake reminds me of spring, though I made it last fall. It is also one of my all-time favorites!
This is a cake I made to share with two of my closest friends on our annual girls' weekend. These girls are the best and we sure to have a lot of fun together! Though we don't live near each other anymore, we always seem to be able to pick up right where we left off. Everyone should have friends like these! So, special cake for special friends. Seems fitting, doesn't it?
I began this extra-tall cake (7 inches, as opposed to the normal 3.5 to 4 inches tall) with my favorite dark chocolate cake recipe, filling with vanilla swiss meringue buttercream and covered with dark chocolate ganache. I then covered all of that with fondant in what is currently one of my favorite colors. It's kind of a light teal/aqua color - blue with just a hint of green.
For the decoration, I used edible paper. You can buy edible paper at your local craft store that sells cake decorating supplies. I used the Wilton brand edible paper, but you could use any you like. I then used a paper punch that I found on clearance at Hobby Lobby a long time ago and have never used on non-edible paper. (Some of you are laughing now because you know I am NOT a scrapbooker! I do admire those of you who do an amazing job with paper-crafting!) I punched out strips, then lined them up and attached them to the fondant with a little paint brush (also reserved only for food and not real paint) dipped in some water.
This was such an easy way to get a fun graphic design onto the cake! I really love love love this technique!
I put the edible paper design about two-thirds of the way up the cake and place a ribbon (non-edible, though you could certainly use the edible paper or fondant for this too) at the top of the graphic design.
I then made a quick little fantasy flower out of fondant and attached it to the top edge of the cake. The center of the flower is just three little balls of the blue fondant that I used to cover the cake.
I love how the blue and white look in this cake and how it all came together!
Thanks for stopping by! Happy spring!!
This is always the time of year when we long for spring to come, for winter and cold temperatures to tuck themselves away for the season and be done, and for the sun to shine warmly once again. This year is no different. In fact, I think we are all longing for spring even more than usual after this hard and utterly cold winter we've all had!
This cake reminds me of spring, though I made it last fall. It is also one of my all-time favorites!
This is a cake I made to share with two of my closest friends on our annual girls' weekend. These girls are the best and we sure to have a lot of fun together! Though we don't live near each other anymore, we always seem to be able to pick up right where we left off. Everyone should have friends like these! So, special cake for special friends. Seems fitting, doesn't it?
I began this extra-tall cake (7 inches, as opposed to the normal 3.5 to 4 inches tall) with my favorite dark chocolate cake recipe, filling with vanilla swiss meringue buttercream and covered with dark chocolate ganache. I then covered all of that with fondant in what is currently one of my favorite colors. It's kind of a light teal/aqua color - blue with just a hint of green.
For the decoration, I used edible paper. You can buy edible paper at your local craft store that sells cake decorating supplies. I used the Wilton brand edible paper, but you could use any you like. I then used a paper punch that I found on clearance at Hobby Lobby a long time ago and have never used on non-edible paper. (Some of you are laughing now because you know I am NOT a scrapbooker! I do admire those of you who do an amazing job with paper-crafting!) I punched out strips, then lined them up and attached them to the fondant with a little paint brush (also reserved only for food and not real paint) dipped in some water.
This was such an easy way to get a fun graphic design onto the cake! I really love love love this technique!
I put the edible paper design about two-thirds of the way up the cake and place a ribbon (non-edible, though you could certainly use the edible paper or fondant for this too) at the top of the graphic design.
I then made a quick little fantasy flower out of fondant and attached it to the top edge of the cake. The center of the flower is just three little balls of the blue fondant that I used to cover the cake.
I love how the blue and white look in this cake and how it all came together!
Thanks for stopping by! Happy spring!!
Tuesday, August 27, 2013
Filled Up, Poured Out
Last week, I had the wonderful privilege of making a dessert for a Women's Ministries Kick-off event for my church. As I was thinking about what to make, I thought of the theme for this year, "Filled Up, Poured Out." It stems from Romans 15:13, "May the God of hope fill you with all joy and peace as you trust in Him, so that you may overflow with hope by the power of the Holy Spirit." I really love this verse and the theme for this year! Hope, joy, peace, filled and overflowing with and through the power of God! Wonderful!
The image that goes along with the theme is a pitcher overflowing with water. I thought that would be perfect for a cake! So, I carved a pitcher out of cake and made it "pour" out water. Pretty cool, huh? I was very excited about how this one turned out!
I haven't carved a lot, so it took quite a bit of planning and thinking for me to get this to work. I wanted the pitcher to appear as if it was tilted, pouring out the water. That was the most difficult part! To make the shape, I took 6-inch and 8-inch cakes and stacked them on top of each other. Then I carved the shape of the pitcher little by little with a thin serrated knife. I covered the top of the cake with blue candy clay so that I could later make it look like the pitcher was filled with water. The rest of the pitcher was covered with gray candy clay. Normally, I would not cover an entire cake with candy clay or modelling chocolate, but I wanted to make the top of the pitcher appear thin and higher than the water. Unlike fondant, candy clay holds it's shape and will stand up even with nothing supporting it directly. The seams are also easier to blend away with candy clay, which melts slightly until the pressure and warmth of a finger.
To apply the candy clay, I rolled it out as thinly as possible onto a sheet of waxed paper, then used the waxed paper to wrap the candy clay around the ganached cake. I then peeled away the waxed paper and smoothed out the candy clay onto the cake using my fondant smoothers and my hands. The edges didn't come together everywhere, so I took scraps of the candy clay and pieced them onto the cake where they were needed, smoothing the edges with my fingers. It was definitely a process and not as easy as it sounds!
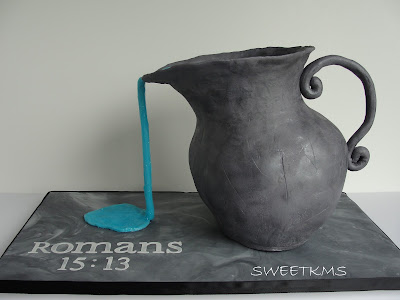
I decided to leave the finish on the pitcher a little rough. So, I marked it up a bit and colored it a little with black and silver petal dust, brushed on randomly to create a tarnished look. In the verse, we as humans are the vessels. We are the pitcher being filled with hope from God. We are imperfect vessels, yet we are fully accepted and even welcomed by God and freely given the gifts of hope, joy and peace. So, my pitcher cake needed to be an imperfect vessel, too. Sometimes imperfection can be beautiful!
To make the "water", I used more candy clay, a long rope for the water pouring from the pitcher and a flat piece to be the puddle of water on the board. I tinted some piping gel with blue coloring and swiped it with a spatula over all of the blue candy clay to make it look watery. It worked perfectly!
The board is cut from 1/2-inch foam core and covered with black and white fondant, marbled together. I like the effect, but I wish I would have done a different color. The board matched the pitcher a little too well! The letters and numbers were cut out of an icing sheet.
Inside this beauty is some serious deliciousness. Lightly lemon blueberry cake with blueberry swiss meringue buttercream. White chocolate ganache covered the entire thing underneath the candy clay. It was enjoyed by all!
Here is the recipe so you can make it yourself! Enjoy!!
Lemon Blueberry Cake with Blueberry Swiss Meringue Buttercream
For the Cake:
3 cups (12 ounces) unbleached all purpose flour
1 (1/2 ounce) tablespoon potato starch
2 teaspoons baking powder
1/4 teaspoon baking soda
3/4 teaspoon salt
2 cups (14 ounces) granulated sugar
3 whole large eggs
2 tablespoons pure vanilla extract or vanilla paste
3/4 cup (6 liquid ounces) buttermilk
1/2 cup (4 ounces) unsalted butter, room temperature
1 teaspoon lemon zest
1 teaspoon fresh lemon juice
1 cup frozen blueberries (do not thaw)
For the Buttercream:
6 egg whites
12 ounces granulated sugar
Pinch salt
12.5 ounces unsalted high-quality butter (I use Kerrygold), very soft room temperature
1 tablespoon pure vanilla extract
½ - 1 cup fresh blueberry puree*
Preheat the oven to 350 degrees F. Prepare 2 8-inch round cake pans by greasing them with shortening, lining them with parchment paper and dusting lightly with flour.
Whisk together the flour, potato starch, baking powder, baking soda, salt, and sugar in the bowl of a stand mixer. In a separate small bowl, whisk together the eggs, vanilla and a splash of the buttermilk. Set aside.
Add the rest of the buttermilk and the butter to the flour mixture and mix with the paddle attachment on low speed until moistened, then on medium speed for 90 seconds. Scrape the sides of the bowl with a spatula.
Whisk the lemon juice and lemon zest into the egg mixture, then add in three parts to the flour/butter mixture. Add each part on low speed then mix on medium speed for 20 seconds after each addition. Gently mix in the frozen blueberries. (Adding them frozen keeps the batter from turning purple, as does mixing them in quickly and gently.)
Divide evenly into the prepared pans and bake in the preheated oven for 35 to 45 minutes or until a toothpick inserted in the center comes out with only a few moist crumbs attached. Cool in pans on a wire cooling rack for 10 minutes, then remove from pan and cool completely. Tort and frost as desired or wrap tightly and carefully in plastic wrap and aluminum foil and freeze for up to one month. Thaw completely before unwrapping.
While the cake is cooling, make the buttercream. Whisk together the egg whites, sugar and salt in a large bowl that sits comfortably on top of a saucepan, or in the top bowl of a double boiler. (The bowl should have no trace of fat (including egg yolks) in it anywhere or your egg whites will not whip up properly. I often wipe my bowl down with some vinegar or the cut side of a lemon to remove any residue then dry it before putting my egg whites in.) Bring about an inch of water to a boil in a large saucepan upon which the bowl will sit without touching the water, or in the bottom pan of a double boiler if that is what you are using. Make sure that the water will NOT touch the bottom of the bowl in which the eggs are placed or the eggs will scramble. Once the water is boiling, turn down the heat to a simmer and set the bowl with the egg whites mixture on top. Whisk continually until the egg white mixture reaches 165 degrees F on a candy thermometer, or until the egg whites are very foamy and all the sugar is dissolved, about 5 minutes.
When the eggs reach 165 degrees F., pour the mixture through a fine-mesh strainer into the bowl of a stand mixer. Immediately put the bowl onto the mixer with the whisk attachment and whip on high speed until the eggs reach stiff peaks and the bowl is cool to the touch. This can take 10 minutes or more. Once the egg whites have reached stiff peaks, turn the mixer to the lowest setting and add the softened butter one tablespoon at a time until all of the butter is incorporated into the egg whites. Continue to mix on the lowest speed until the buttercream comes together. It will look soupy and curdled at first. That’s normal! Keep mixing on low speed and it will come together. Just keep an eye on it and stop the mixer when the buttercream looks smooth and silky.
Once it comes together, switch to the paddle attachment and add the vanilla extract. Mix on low until incorporated. Add the puree a little at a time to ensure that it is fully incorporated. Add more to taste, being careful not to break the buttercream by adding too much.
*To make the blueberry puree, heat 2 cups of fresh or frozen blueberries in a medium saucepan with a few tablespoons of water until the blueberries begin to break down and the liquid is boiling. Once it is boiling, mash the blueberries with a potato masher or a wooden spoon. For a very smooth sauce, puree with an immersion blender right in the pot or briefly remove from the heat and puree in a blender. Reduce to a simmer and continue to cook, stirring occasionally, until reduced by half. Remove from the heat and stir in a teaspoon of fresh lemon juice.
The image that goes along with the theme is a pitcher overflowing with water. I thought that would be perfect for a cake! So, I carved a pitcher out of cake and made it "pour" out water. Pretty cool, huh? I was very excited about how this one turned out!
I haven't carved a lot, so it took quite a bit of planning and thinking for me to get this to work. I wanted the pitcher to appear as if it was tilted, pouring out the water. That was the most difficult part! To make the shape, I took 6-inch and 8-inch cakes and stacked them on top of each other. Then I carved the shape of the pitcher little by little with a thin serrated knife. I covered the top of the cake with blue candy clay so that I could later make it look like the pitcher was filled with water. The rest of the pitcher was covered with gray candy clay. Normally, I would not cover an entire cake with candy clay or modelling chocolate, but I wanted to make the top of the pitcher appear thin and higher than the water. Unlike fondant, candy clay holds it's shape and will stand up even with nothing supporting it directly. The seams are also easier to blend away with candy clay, which melts slightly until the pressure and warmth of a finger.
To apply the candy clay, I rolled it out as thinly as possible onto a sheet of waxed paper, then used the waxed paper to wrap the candy clay around the ganached cake. I then peeled away the waxed paper and smoothed out the candy clay onto the cake using my fondant smoothers and my hands. The edges didn't come together everywhere, so I took scraps of the candy clay and pieced them onto the cake where they were needed, smoothing the edges with my fingers. It was definitely a process and not as easy as it sounds!
I decided to leave the finish on the pitcher a little rough. So, I marked it up a bit and colored it a little with black and silver petal dust, brushed on randomly to create a tarnished look. In the verse, we as humans are the vessels. We are the pitcher being filled with hope from God. We are imperfect vessels, yet we are fully accepted and even welcomed by God and freely given the gifts of hope, joy and peace. So, my pitcher cake needed to be an imperfect vessel, too. Sometimes imperfection can be beautiful!
To make the "water", I used more candy clay, a long rope for the water pouring from the pitcher and a flat piece to be the puddle of water on the board. I tinted some piping gel with blue coloring and swiped it with a spatula over all of the blue candy clay to make it look watery. It worked perfectly!
The board is cut from 1/2-inch foam core and covered with black and white fondant, marbled together. I like the effect, but I wish I would have done a different color. The board matched the pitcher a little too well! The letters and numbers were cut out of an icing sheet.
Inside this beauty is some serious deliciousness. Lightly lemon blueberry cake with blueberry swiss meringue buttercream. White chocolate ganache covered the entire thing underneath the candy clay. It was enjoyed by all!
Here is the recipe so you can make it yourself! Enjoy!!
Lemon Blueberry Cake with Blueberry Swiss Meringue Buttercream
For the Cake:
3 cups (12 ounces) unbleached all purpose flour
1 (1/2 ounce) tablespoon potato starch
2 teaspoons baking powder
1/4 teaspoon baking soda
3/4 teaspoon salt
2 cups (14 ounces) granulated sugar
3 whole large eggs
2 tablespoons pure vanilla extract or vanilla paste
3/4 cup (6 liquid ounces) buttermilk
1/2 cup (4 ounces) unsalted butter, room temperature
1 teaspoon lemon zest
1 teaspoon fresh lemon juice
1 cup frozen blueberries (do not thaw)
For the Buttercream:
6 egg whites
12 ounces granulated sugar
Pinch salt
12.5 ounces unsalted high-quality butter (I use Kerrygold), very soft room temperature
1 tablespoon pure vanilla extract
½ - 1 cup fresh blueberry puree*
Preheat the oven to 350 degrees F. Prepare 2 8-inch round cake pans by greasing them with shortening, lining them with parchment paper and dusting lightly with flour.
Whisk together the flour, potato starch, baking powder, baking soda, salt, and sugar in the bowl of a stand mixer. In a separate small bowl, whisk together the eggs, vanilla and a splash of the buttermilk. Set aside.
Add the rest of the buttermilk and the butter to the flour mixture and mix with the paddle attachment on low speed until moistened, then on medium speed for 90 seconds. Scrape the sides of the bowl with a spatula.
Whisk the lemon juice and lemon zest into the egg mixture, then add in three parts to the flour/butter mixture. Add each part on low speed then mix on medium speed for 20 seconds after each addition. Gently mix in the frozen blueberries. (Adding them frozen keeps the batter from turning purple, as does mixing them in quickly and gently.)
Divide evenly into the prepared pans and bake in the preheated oven for 35 to 45 minutes or until a toothpick inserted in the center comes out with only a few moist crumbs attached. Cool in pans on a wire cooling rack for 10 minutes, then remove from pan and cool completely. Tort and frost as desired or wrap tightly and carefully in plastic wrap and aluminum foil and freeze for up to one month. Thaw completely before unwrapping.
While the cake is cooling, make the buttercream. Whisk together the egg whites, sugar and salt in a large bowl that sits comfortably on top of a saucepan, or in the top bowl of a double boiler. (The bowl should have no trace of fat (including egg yolks) in it anywhere or your egg whites will not whip up properly. I often wipe my bowl down with some vinegar or the cut side of a lemon to remove any residue then dry it before putting my egg whites in.) Bring about an inch of water to a boil in a large saucepan upon which the bowl will sit without touching the water, or in the bottom pan of a double boiler if that is what you are using. Make sure that the water will NOT touch the bottom of the bowl in which the eggs are placed or the eggs will scramble. Once the water is boiling, turn down the heat to a simmer and set the bowl with the egg whites mixture on top. Whisk continually until the egg white mixture reaches 165 degrees F on a candy thermometer, or until the egg whites are very foamy and all the sugar is dissolved, about 5 minutes.
When the eggs reach 165 degrees F., pour the mixture through a fine-mesh strainer into the bowl of a stand mixer. Immediately put the bowl onto the mixer with the whisk attachment and whip on high speed until the eggs reach stiff peaks and the bowl is cool to the touch. This can take 10 minutes or more. Once the egg whites have reached stiff peaks, turn the mixer to the lowest setting and add the softened butter one tablespoon at a time until all of the butter is incorporated into the egg whites. Continue to mix on the lowest speed until the buttercream comes together. It will look soupy and curdled at first. That’s normal! Keep mixing on low speed and it will come together. Just keep an eye on it and stop the mixer when the buttercream looks smooth and silky.
Once it comes together, switch to the paddle attachment and add the vanilla extract. Mix on low until incorporated. Add the puree a little at a time to ensure that it is fully incorporated. Add more to taste, being careful not to break the buttercream by adding too much.
*To make the blueberry puree, heat 2 cups of fresh or frozen blueberries in a medium saucepan with a few tablespoons of water until the blueberries begin to break down and the liquid is boiling. Once it is boiling, mash the blueberries with a potato masher or a wooden spoon. For a very smooth sauce, puree with an immersion blender right in the pot or briefly remove from the heat and puree in a blender. Reduce to a simmer and continue to cook, stirring occasionally, until reduced by half. Remove from the heat and stir in a teaspoon of fresh lemon juice.
Friday, March 15, 2013
Spring Has Sprung
Hello!
That title is wishful thinking for me. Spring has not made it here quite yet, though I am wishing hard for it! Maybe soon it will be here. And maybe I can help it along with this cheerful little cake.
I recently saw a clutch on Pinterest with cute little folded circles on it. I immediately thought of cake and fondant circles. This week, I had the opportunity to try it out and I love how it looks!
I so wanted to post the inspiration picture here, but in my non-tech-savviness I cannot figure out how to do it. But I can give you the link! I do hope you take a look! Click here to see the inspiration for this cake! Here is the direct link to the blog post where I found the picture. Go and visit and show her some love too! And if any of you sew, she has some really fantastic ideas!
Now, back to the cake.

I wanted to use spring colors and my kids helped me to choose. We decided on green for the main color and a peek of yellow and orange in the circles, though in the pictures it looks all yellow. Of course, you could do this in any color combination or design.
To make the design, roll out some green fondant pretty thin and cut out all the circles. This design, including the little flower in the top of the cake, used 18 circles and a 1.5-inch round cutter. Cover them all with saran wrap to keep them from drying out while marbling some orange and yellow fondant. Use big pieces of each color and don't knead them together very much at all because they will just blend more when you roll it out. You can see from mine, above, that by the time I was finished with them, the orange had nearly disappeared. Roll and cut the marbled fondant just like the green, creating 18 new circles. Next, place the marbled fondant circles on top of the green fondant circles, sticking them together with a brush of vodka. Roll each one just a little to bond them together. Make sure to keep the rest covered so they won't dry out. The rolling will stretch out the circle a bit, so cut a new one with the same cutter and smooth the edges with your finger. Immediately fold over the top part of the circle on each side to make a little roll at the top with the bottom flared open. Seal the fold with a bit of vodka and press lightly but don't flatten it altogether. Place them on the cake beginning with the lowest line. Cover the pinched tops with the next row of circles. The pinched tops of the upper row can be covered with a strip of fondant.
For the flower on the top, Place six of the folded circles together with the flared ends facing out and cover the center pinched ends with tiny balls of fondant bunched together to look like a flower's center.

This cake was just for my family, so it is pretty small (6 inches). It is lightly lemon cake with strawberry jam and strawberry swiss meringue buttercream filling. I covered the cake in swiss meringue and then in fondant.
The whole time I was planning and working on this cake, I had in mind the inspiration that I linked to above. When I was nearing the end, it finally dawned on me that these little rolled circles were shaped just like calla lillies! There is nothing new in the world, huh? Well, I think this is a new spin on the calla lilly shape. I hope you like it!
Thanks for stopping by!
That title is wishful thinking for me. Spring has not made it here quite yet, though I am wishing hard for it! Maybe soon it will be here. And maybe I can help it along with this cheerful little cake.
I recently saw a clutch on Pinterest with cute little folded circles on it. I immediately thought of cake and fondant circles. This week, I had the opportunity to try it out and I love how it looks!
I so wanted to post the inspiration picture here, but in my non-tech-savviness I cannot figure out how to do it. But I can give you the link! I do hope you take a look! Click here to see the inspiration for this cake! Here is the direct link to the blog post where I found the picture. Go and visit and show her some love too! And if any of you sew, she has some really fantastic ideas!
Now, back to the cake.

I wanted to use spring colors and my kids helped me to choose. We decided on green for the main color and a peek of yellow and orange in the circles, though in the pictures it looks all yellow. Of course, you could do this in any color combination or design.
To make the design, roll out some green fondant pretty thin and cut out all the circles. This design, including the little flower in the top of the cake, used 18 circles and a 1.5-inch round cutter. Cover them all with saran wrap to keep them from drying out while marbling some orange and yellow fondant. Use big pieces of each color and don't knead them together very much at all because they will just blend more when you roll it out. You can see from mine, above, that by the time I was finished with them, the orange had nearly disappeared. Roll and cut the marbled fondant just like the green, creating 18 new circles. Next, place the marbled fondant circles on top of the green fondant circles, sticking them together with a brush of vodka. Roll each one just a little to bond them together. Make sure to keep the rest covered so they won't dry out. The rolling will stretch out the circle a bit, so cut a new one with the same cutter and smooth the edges with your finger. Immediately fold over the top part of the circle on each side to make a little roll at the top with the bottom flared open. Seal the fold with a bit of vodka and press lightly but don't flatten it altogether. Place them on the cake beginning with the lowest line. Cover the pinched tops with the next row of circles. The pinched tops of the upper row can be covered with a strip of fondant.
For the flower on the top, Place six of the folded circles together with the flared ends facing out and cover the center pinched ends with tiny balls of fondant bunched together to look like a flower's center.

This cake was just for my family, so it is pretty small (6 inches). It is lightly lemon cake with strawberry jam and strawberry swiss meringue buttercream filling. I covered the cake in swiss meringue and then in fondant.
The whole time I was planning and working on this cake, I had in mind the inspiration that I linked to above. When I was nearing the end, it finally dawned on me that these little rolled circles were shaped just like calla lillies! There is nothing new in the world, huh? Well, I think this is a new spin on the calla lilly shape. I hope you like it!
Thanks for stopping by!
Saturday, January 26, 2013
Painted Paisleys
I have been dying to share this with all of you. It is one of my new favorite techniques for decorating!
Painting... on a cake! How cool is that?
I was inspired by this scrapbook paper. The colors drew me in and the pattern, pared down, seemed perfect for a small cake.
I have admired this decorating technique for awhile now and Craftsy recently added a class on it, taught by one of my favorite cake artists. Please take a minute and go check her out at Three Little Blackbirds. Better yet, check out her free (yes, free!) class at Craftsy.
The background for my painting is white fondant. The "paint" is actually gel food colors diluted with a little vodka and water mix (50/50). I painted it all free-hand with the scrapbook paper in front of me for guidance.
It was so much fun to sit and paint this. I'll definitely be doing this more and I'm looking forward to playing with different colors and designs.
The cake inside is a vanilla butter cake with blackberry swiss meringue buttercream filling. So tasty! Come back soon for the recipe for the cake. I've been playing with my normal recipe and I think I have a new winner!
Doesn't it look delicious?
Thanks for stopping by!
Subscribe to:
Posts (Atom)


