Showing posts with label Painting. Show all posts

Friday, January 24, 2014

Lordy Lordy Look Who's Forty

Yep, you guessed it. It's me. Back in November I turned the big 4-0. I admit, I had a hard time with it. There's something about 40 that seems significantly older than the previous milestone birthdays. A doctor actually called me "middle-aged" a couple of weeks ago. Ouch!

Turns out, though, that 40 isn't so bad. I wouldn't trade now for younger ages and all the old insecurities. And there really is something to be said for wisdom that comes with age. This is going to be a good decade, I think!

To celebrate my big birthday, my husband threw me a fantastic party with several close friends and their families. It was so much fun! We rented a pinball machine and that was the hit of the party, I think. So much fun!

Of course, I made my own cake. It was huge. And fun. And a little disappointing. Here is a picture of the whole thing.


First, the fun part. It was fun to make such a big cake and get to serve it at my own party. The top tier was gluten-free for a couple of my allergic friends. I loved being able to make a delicious cake customized just for them!

My favorite part was done by my son. He had a grand plan for my cake and I let him design the whole thing. For inspiration, he grabbed a picture of our family that was taken during our vacation last summer and painted it onto the cake. The kid's got ambition! And some serious skills for an 8-year-old, in my humble opinion. I'm not biased at all, of course! After he painted me and his Dad, he got tired and decided the picture was complete. I happen to love how it turned out!


I put a little fondant flower on the top to complete the overall look.


Now for the disappointing part. You can see it on the side of the cake in that first picture and again in the picture of the painting. See that sag on the side of the cake? Yep, my caketastrophe. After I stacked the cakes, the middle tier began to collapse. That tier is an extra-tall tier and required supports halfway through the cake. Though I never figured out exactly why the cake began to collapse, I think that I did not properly space the supports in the bottom half of the tall tier. When I stacked the tiers, the weight caused the cake to buckle.


What you see in the pictures got worse and worse, but thank goodness the cake did not fall down completely before we were able to cut and eat it. If this was going to happen, I am glad it happened on my own cake and not one meant for someone else! And, despite the disappointing look of the buckled fondant, the cake was still delicious and enjoyed by all!

Tuesday, November 26, 2013

CakeCentral Magazine - A Second Time!!

Hello! Welcome back! Many of you already know that one of my cakes made it (again!) into CakeCentral Magazine. I was so honored to have cakes in back-to-back issues!


This second cake was for the October issue. CakeCentral sent me a picture by the illustrator Arthur Rackham from the Grimm Brother's story, The Seven Ravens. It is an amazing illustration! I was lucky to get to work with it.


Most of all, I wanted to capture the eerie feel of the illustration. It is a little dark, but not overly so, and cool in tone. I wanted to make sure my cake design reflected all of that. I focused on the pattern and colors of the waters in the picture and used that as the main element of my cake.

I painted the waves onto the cake using a watercolor technique with vodka and food coloring, going from darker at the bottom to lighter moving up the tiers. I left the very top tier unpainted.


This painting actually went a lot better than I had anticipated. I thought I would have trouble with it, but it was actually really simple. I used a very "watery" paint, using more vodka than I normally would to paint with food coloring on the fondant. I then put the tier onto my turntable and spun it slowly while moving my brush up and down against the side. Does that make sense? It all went on really well and I was so pleased with the effect!

To bring in more of the Ravens story, I covered the very bottom tier in jet black fondant and made some fondant feathers, which I dried on a curve and set around the entire tier. I used a leaf cutter to make it easier and make sure the feathers were more uniform. Then I took my knife tool (you could also use the dull side of a butter knife) and gently scored a line in the middle of each feather and all along the edges to create the feather look.


As the finishing touch, I decided to do sugar pieces to reflect the ice mountain, against which the girl is standing. I ended up using Isomalt to make my sugar pieces because it dries clear and that is the look that I needed. Real sugar is cloudy when it dries and opaque and it just didn't look right. After the Isomalt was heated to the right temperature (per package instructions), I added a drop or two of blue and black food coloring, gently swirled it, then poured it onto a parchment-covered sheet pan. After it was completely cool and hardened, I cracked it into large and small pieces. I then took the pieces and attached them to the finished cake.


I really loved these sugar pieces! They were just as I had hoped they would be! The only problem was that they don't photograph super well. It is difficult to photograph a clear piece of sugar! But my photographer for this cake, Lisa Vargo, did such a fantastic job with it. By the way, Lisa is an amazing photographer! Check her out here!

I had so much fun doing this cake. I hope that CakeCentral Magazine continues to call on me to make cakes for their awesome publication! If you would like to check out all of the amazing cakes in the October issue, or any other issue, visit CakeCentral.com and click on the "Magazine" link. You can also buy individual issues for download from iTunes.

I am so, so thankful that I get to make cakes and hopefully bring smiles to those who see, and often eat, my creations. During this holiday season, this week at Thanksgiving and through the end of the year, I hope that you all take the time to think about all of the gifts and blessings you have been given and to give thanks for them! I am also so thankful for all of you! Happy Thanksgiving!

Tuesday, August 6, 2013

Celebrating 90 Years

Hello Everyone! I hope that you are all enjoying your summer! We just got back from a wonderful vacation up in Michigan. Though it was a little colder than we would have liked, we had a fantastic time.

Before vacation, at the beginning of July, I had the opportunity to make a cake for the grandmother of one of my very dear friends. Vi was turning 90 and they were throwing her a huge party. I was honored to be asked to make the cake!

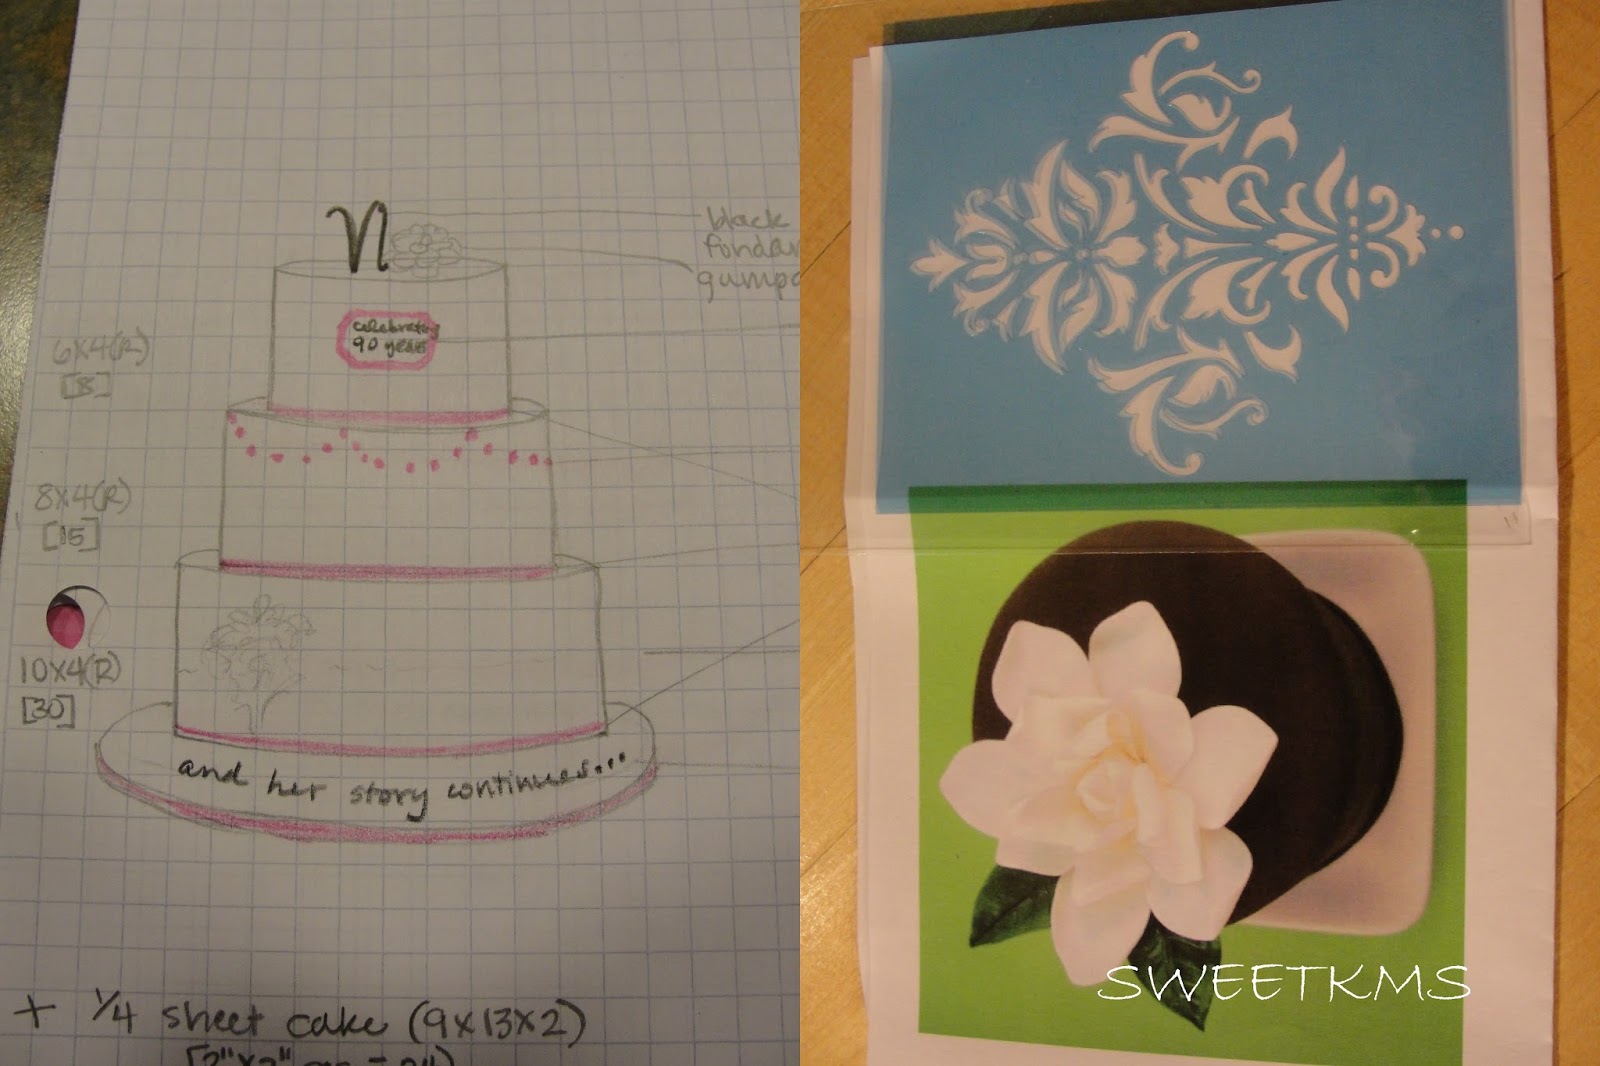
For inspiration, I was sent a copy of the invitation and I took my colors from that. The design of the invitation matched a stencil I had, so I wanted to use that too. I kept the whole design pretty simple, with a gumpaste gardenia (Vi's favorite flower) on the top.

I'll start here by showing you the picture of my sketch and inspiration pieces. Maybe you'd like to see how I start? If not, just skip this part! :) My drawing isn't the best, so you'll have to excuse that, but drawing out my cake gives me an idea of how all of the elements will look before I begin my cake. Sometimes I get an idea on paper and realize it wasn't a great idea to begin with. Seeing that right from the start saves me a lot of time and trouble in the end! I also use my sketches to show others my ideas to see if I am on their page about what the cake will look like.

Here is my sketch, the stencil and a picture of a gumpaste gardenia I found online. (Jacqueline Butler from PetalSweet made this one. If you like sugar flowers, go check out her site. You will be amazed!)


This was by far the biggest cake I have made for another person. It was meant to serve 75 people, though some of those servings came from a separate sheet cake so that I could keep the main cake more simple and save costs by not using fondant for the sheet cake.

Here is the main cake finished.


The stencil is my favorite part, I think. I love that it is subtle and adds an element of sophistication and simple prettiness to the cake.


The message on the cake was what was written on the invitation. The whole thing reads "Celebrating 90 Years. And her story continues..." I really love this for a milestone birthday because it shows that it is not only the life lived that is celebrated, but also the life yet to be lived. I was going to use fondant to make the message, but in the end it didn't seem right for this cake. The spacing would have been off and the block letters just didn't seem to "go" with the rest of the design. So, I chose to hand-paint it with food coloring. I really love how it looks on the cake! I was so nervous painting black onto white because every little mistake would show and I'm not really used to painting, especially letters. It was so much fun to "write" with that long, thin brush. Makes me want to learn calligraphy! You know, because I need another thing on my to-do list! :) It would be fun though...


For the topper, I made the birthday girl's name out of modeling chocolate and placed it on top of the cake next to a gumpaste gardenia.


Competing for my favorite thing on this cake is the gardenia. These little guys gave me a bit of trouble, but in the end, I think they are beautiful!


The sheet cake (actually a quarter sheet cake) was iced in smoothed buttercream and decorated with a fondant plaque. I admit that the look of this one isn't my favorite, but I do like the different elements. And I heard that the cake as a whole was loved by all! That absolutely makes my day and makes all of the effort totally worth it!

For those of you who would like to imagine eating this beauty, let me share the flavors with you. The top two tiers were vanilla bean cake with raspberry vanilla Swiss meringue buttercream filling, covered with white chocolate ganache. The bottom tier was chocolate cake with vanilla bean Swiss meringue buttercream filling covered with dark chocolate ganache. The quarter sheet cake was chocolate cake covered with vanilla buttercream. Of course I had to taste the scraps. You know, just to make sure I'm giving away a quality delicious cake. I may have had a bowlful. I won't tell you how big the bowl was! But I will tell you it was delicious!

Thank you Ginny and Julie for letting me be a part of this celebration! And to Vi, may you have many more happy birthdays to come!

Thanks for stopping by!

Saturday, January 26, 2013

Painted Paisleys


I have been dying to share this with all of you. It is one of my new favorite techniques for decorating!

Painting... on a cake! How cool is that?

I was inspired by this scrapbook paper. The colors drew me in and the pattern, pared down, seemed perfect for a small cake.


I have admired this decorating technique for awhile now and Craftsy recently added a class on it, taught by one of my favorite cake artists. Please take a minute and go check her out at Three Little Blackbirds. Better yet, check out her free (yes, free!) class at Craftsy.

The background for my painting is white fondant. The "paint" is actually gel food colors diluted with a little vodka and water mix (50/50). I painted it all free-hand with the scrapbook paper in front of me for guidance.


It was so much fun to sit and paint this. I'll definitely be doing this more and I'm looking forward to playing with different colors and designs.

The cake inside is a vanilla butter cake with blackberry swiss meringue buttercream filling. So tasty! Come back soon for the recipe for the cake. I've been playing with my normal recipe and I think I have a new winner!

Doesn't it look delicious?


Thanks for stopping by!